Quickstart
This page will walk you through the basics of using Brownie. Please review the rest of the documentation to learn more about specific functionality.
Installing Brownie
Dependencies
Before installing Brownie, make sure you have the following dependencies:
- ganache-cli
- pip
- python3 version 3.6 or greater, python3-dev, python3-tk
As brownie relies on py-solc-x, you do not need solc installed locally but you must install all required solc dependencies.
Installation
The easiest way to install Brownie is via pip.
$ pip install eth-brownie
You can also clone the github repository and use setuptools for the most up-to-date version.
$ python3 setup.py install
Initializing a New Project
The first step to using Brownie is to initialize a new project. To do this, create an empty folder and then type:
$ brownie init
This will create the following project structure within the folder:
build/: Compiled contracts and test datacontracts/: Contract source codescripts/: Scripts for deployment and interactiontests/: Scripts for testing your projectbrownie-config.yaml: Configuration file for the project
You can also initialize “Brownie mixes”, simple templates to build your project upon. For the examples in this document we will use the token mix, which is a very basic ERC-20 implementation:
$ brownie bake token
This creates a new folder token/ and deploys the project inside it.
Compiling your Contracts
To compile your project:
$ brownie compile
You will see the following output:
Brownie v1.0.0 - Python development framework for Ethereum

Compiling contracts...
Optimizer: Enabled  Runs: 200
- Token.sol...
- SafeMath.sol...
Brownie project has been compiled at token/build/contracts
Once a contract has been complied, it will only be recompiled if the source file has changed.
You can change the compiler version and optimization settings by editting the config file.
Interacting with your Project
Brownie provides two ways to interact with your project:
- The console is useful for quick testing and debugging as you develop
- Via scripts that handle deployments and to automate common tasks
The Console
The console is an easy to use command-line environment for debugging and testing as you develop. It is almost identical the standard python interpreter. To open it:
$ brownie console
Brownie will compile your contracts, start the local RPC client, and give you a command prompt. From here you may interact with the network with the full range of functionality offered by the Brownie API.
Hint
Within the console, the builtin dir is modified to only display public methods and attributes. It is a valuable tool for exploring Brownie’s functionality as you are getting started.
You can also call help for detailed information on most objects.
Access to local accounts is through accounts, a list-like object that contains Account objects capable of making transactions.
Here is an example of checking a balance and transfering some ether:
>>> accounts[0]
<Account object '0xC0BcE0346d4d93e30008A1FE83a2Cf8CfB9Ed301'>
>>> accounts[1].balance()
100000000000000000000
>>> accounts[0].transfer(accounts[1], "10 ether")

Transaction sent: 0x124ba3f9f9e5a8c5e7e559390bebf8dfca998ef32130ddd114b7858f255f6369
Transaction confirmed - block: 1   gas spent: 21000
<Transaction object '0x124ba3f9f9e5a8c5e7e559390bebf8dfca998ef32130ddd114b7858f255f6369'>
>>> accounts[1].balance()
110000000000000000000
Brownie creates a ContractContainer object for each contract in your project. They are list-like objects used to deploy new contracts.
Here is an example of deploying a contract:
>>> Token
[]
>>> Token.deploy
<ContractConstructor object 'Token.constructor(string _symbol, string _name, uint256 _decimals, uint256 _totalSupply)'>
>>> t = Token.deploy("Test Token", "TST", 18, "1000 ether", {'from': accounts[1]})

Transaction sent: 0x2e3cab83342edda14141714ced002e1326ecd8cded4cd0cf14b2f037b690b976
Transaction confirmed - block: 1   gas spent: 594186
Contract deployed at: 0x5419710735c2D6c3e4db8F30EF2d361F70a4b380
<Token Contract object '0x5419710735c2D6c3e4db8F30EF2d361F70a4b380'>
>>>
>>> t
<Token Contract object '0x5419710735c2D6c3e4db8F30EF2d361F70a4b380'>
When a contact is deployed you are returned a Contract object that can be used to interact with it. This object is also added to the ContractContainer.
Contract objects contain class methods for performing calls and transactions. In this example we are checking a token balance and transfering tokens:
>>> t
<Token Contract object '0x5419710735c2D6c3e4db8F30EF2d361F70a4b380'>
>>> t.balanceOf(accounts[1])
1000000000000000000000

>>> t.transfer
<ContractTx object 'transfer(address _to, uint256 _value)'>
>>> t.transfer(accounts[2], "100 ether", {'from': accounts[1]})

Transaction sent: 0xcd98225a77409b8d81023a3a4be15832e763cd09c74ff431236bfc6d56a74532
Transaction confirmed - block: 2   gas spent: 51241
<Transaction object '0xcd98225a77409b8d81023a3a4be15832e763cd09c74ff431236bfc6d56a74532'>
>>>
>>> t.balanceOf(accounts[1])
900000000000000000000
>>> t.balanceOf(accounts[2])
100000000000000000000
See Project Interaction via the Console for more information on available objects and how they function.
Writing Scripts
You can write scripts to automate contract deployment and interaction. By placing from brownie import * at the beginning of your script, you can access objects identically to the way you would in the console.
To execute the main function in a script, store it in the scripts/ folder and type:
$ brownie run [script name]
Within the token project, you will find an example script at scripts/token.py that is used for deployment:
1 2 3 4 | from brownie import *
def main():
accounts[0].deploy(Token, "Test Token", "TEST", 18, "1000 ether")
|
Testing your Project
Brownie uses the pytest framework for contract testing.
Tests should be stored in the tests/ folder. To run the full suite:
$ pytest tests/
Brownie provides pytest fixtures to allow you to interact with your project and to aid in testing. To use a fixture, add an argument with the same name to the inputs of your test function.
Here is an example test function using Brownie fixtures:
1 2 3 4 5 6 | def test_transfer(Token, accounts):
token = accounts[0].deploy(Token, "Test Token", "TST", 18, "1000 ether")
assert token.totalSupply() == "1000 ether"
token.transfer(accounts[1], "0.1 ether", {'from': accounts[0]})
assert token.balanceOf(accounts[1]) == "0.1 ether"
assert token.balanceOf(accounts[0]) == "999.9 ether"
|
Transactions that revert raise a VirtualMachineError exception. To write assertions around this you can use pytest.reverts as a context manager, which functions very similarly to pytest.raises:
1 2 3 4 5 6 | import pytest
def test_transferFrom_reverts(Token, accounts):
token = accounts[0].deploy(Token, "Test Token", "TST", 18, "1000 ether")
with pytest.reverts():
token.transferFrom(accounts[0], accounts[3], "10 ether", {'from': accounts[1]})
|
Test isolation is handled through the module_isolation and fn_isolation fixtures:
module_isolationresets the local chain before and after completion of the module, ensuring a clean environment for this module and that the results of it will not affect subsequent modules.fn_isolationadditionally takes a snapshot of the chain before running each test, and reverts to it when the test completes. This allows you to define a common state for each test, reducing repetitive transactions.
This example uses isolation and a shared setup fixture:
1 2 3 4 5 6 7 8 9 10 11 12 13 14 15 16 17 18 | import pytest
from brownie import accounts
@pytest.fixture(scope="module")
def token(Token):
t = accounts[0].deploy(Token, "Test Token", "TST", 18, "1000 ether")
yield t
def test_transferFrom(fn_isolation, token):
token.approve(accounts[1], "6 ether", {'from': accounts[0]})
token.transferFrom(accounts[0], accounts[2], "5 ether", {'from': accounts[1]})
assert token.balanceOf(accounts[2]) == "5 ether"
assert token.balanceOf(accounts[0]) == "995 ether"
assert token.allowance(accounts[0], accounts[1]) == "1 ether"
def test_balance_allowance(fn_isolation, token):
assert token.balanceOf(accounts[0]) == "1000 ether"
assert token.allowance(accounts[0], accounts[1]) == 0
|
Brownie monitors which files have changed since the test suite was last executed. Tests that are properly isolated can be skipped if none of the contracts or related test files have changed. To enable this, include the --update flag when running pytest.
See Unit Testing with Pytest for more information on available fixtures, and other features and options related to unit testing.
Analyzing Test Coverage
Test coverage is calculated by generating a map of opcodes associated with each statement and branch of the source code, and then analyzing the stack trace of each transaction to see which opcodes executed.
To check test coverage:
$ pytest tests/ --coverage
To view detailed results, first load the Brownie GUI:
$ brownie gui
Next:
- In the upper-right drop box, select a contract to view.
- In the drop box immediately left of the contract selection, select “coverage”. Then left of that, choose to view either the “statement” or “branch” coverage report.
Relevant code will be highlighted in different colors:
- Green code was executed during the tests
- Yellow branch code executed, but only evaluated truthfully
- Orange branch code executed, but only evaluated falsely
- Red code did not execute during the tests
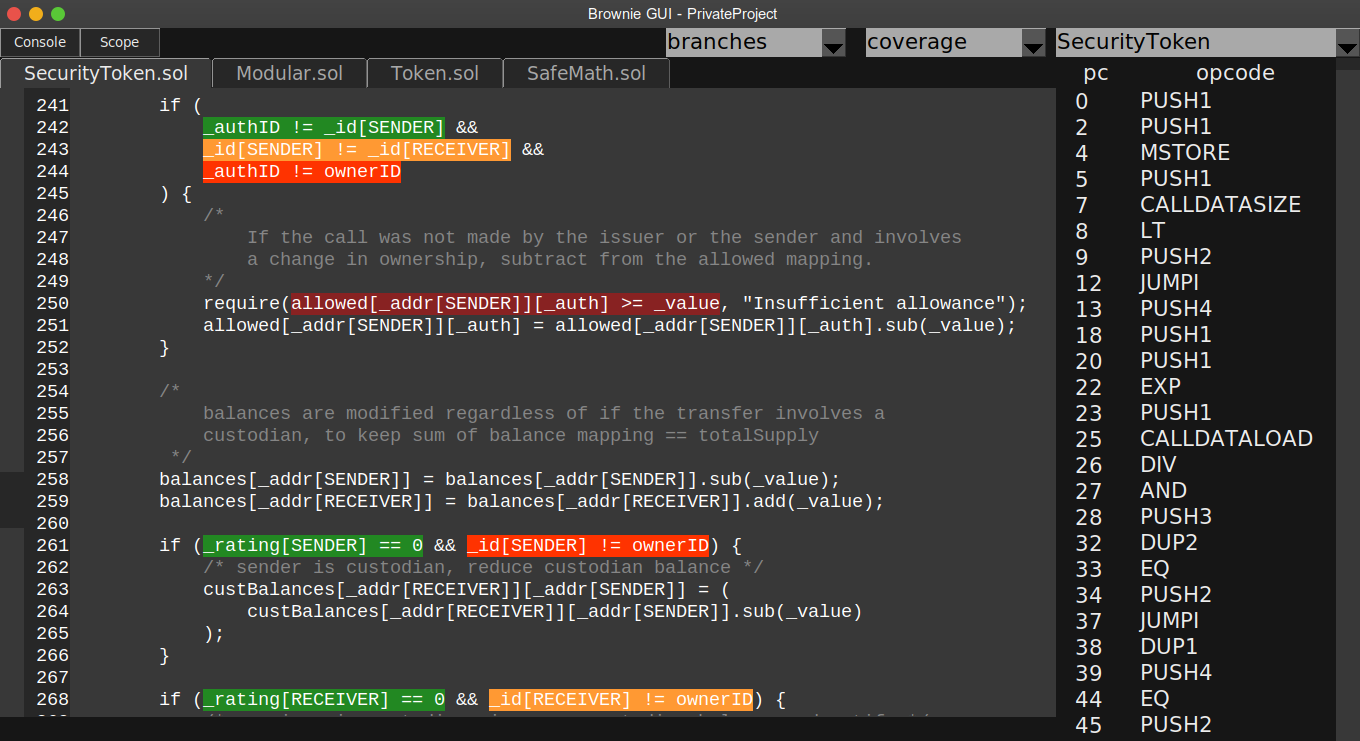
See Coverage Evaluation for more information.
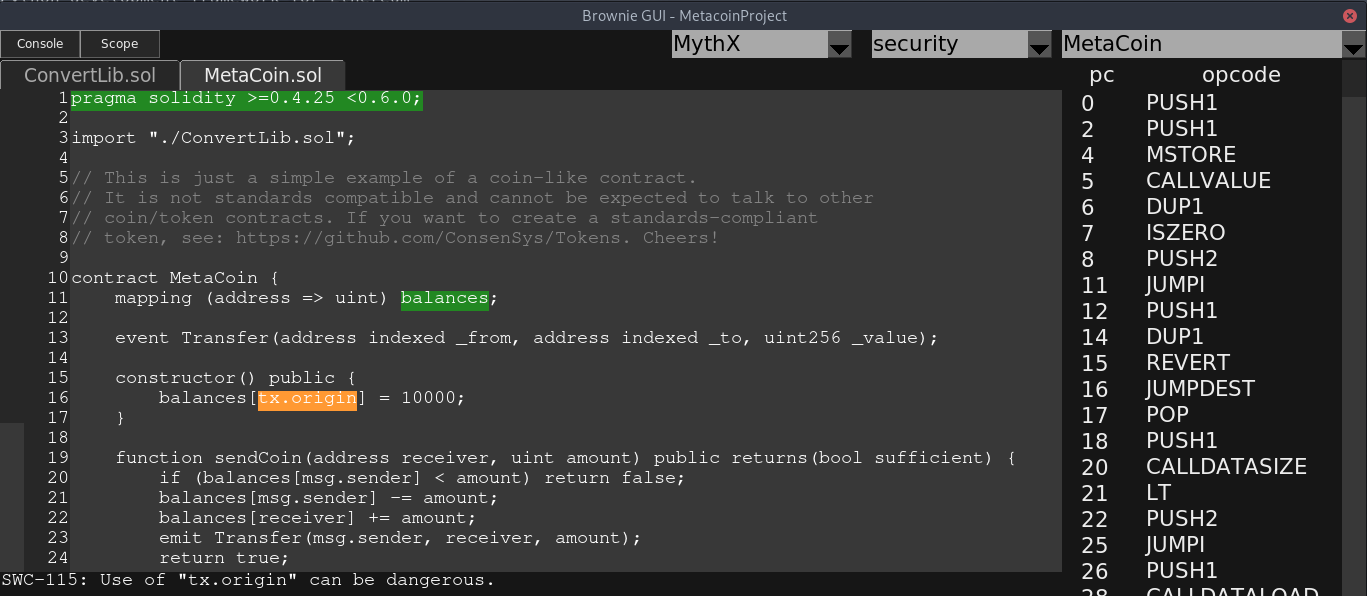
Scanning for Security Vulnerabilities
To prevent vulnerabilities from being introduced to the code base, Brownie a
includes plugin that integrates automated security scans using the
MythX analysis API.
Simply run brownie analyze on your compiled project directory.
This will send the compiled build artifacts to MythX for analysis. By default
no login is required and the analysis is going to be executed as a trial user.
To access more vulnerability information, register for free on the MythX
website and pass your login data via environment variables or command line
arguments.
Brownie v1.0.0 - Python development framework for Ethereum

Usage: brownie analyze [options] [--async | --interval=<sec>]

Options:
--gui                     Launch the Brownie GUI after analysis
--full                    Perform a full scan (MythX Pro required)
--interval=<sec>          Result polling interval in seconds [default: 3]
--async                   Do not poll for results, print job IDs and exit
--access-token=<string>   The JWT access token from the MythX dashboard
--eth-address=<string>    The address of your MythX account
--password=<string>       The password of your MythX account
--help -h                 Display this message

Use the "analyze" command to submit your project to the MythX API for
smart contract security analysis.

To authenticate with the MythX API, it is recommended that you provide
the MythX JWT access token. It can be obtained on the MythX dashboard
site in the profile section. They should be passed through the environment
variable "MYTHX_ACCESS_TOKEN". If that is not possible, it can also be
passed explicitly with the respective command line option.

Alternatively, you have to provide a username/password combination. It
is recommended to pass them through the environment variables as
"MYTHX_ETH_ADDRESS" and "MYTHX_PASSWORD".

You can also choose to not authenticate and submit your analyses as a free
trial user. No registration required! To see your past analyses, get access
to deeper vulnerability detection, and a neat dashboard, register at
https://mythx.io/. Any questions? Hit up dominik.muhs@consensys.net or contact
us on the website!
Once the analysis is done, the vulnerabilities are stored in the
reports/ directory. With brownie analyze --gui the GUI can be
started automatically once the analysis has finished.